Accessing wordpress functions from other page outside wordpess.

Excerpt from http://wpengineer.com/embed-wordpress-functions-outside-wordpress/:


This works, as the wp-load.php build a bridge to all other functions in WordPress.

require( '../my_wordpress_install_root/wp-load.php' );
get_header();
 
echo 'new content outside WordPress';
 
get_footer();
?>
Depending on where the data is needed, it could be, that the absolute path of WordPress is needed. This can be determined by creating a php file with the following contents, put it in the Root of the installation and call it directly. The output is the path to the file.
 echo $_SERVER['DOCUMENT_ROOT']; ?>
This is then used in the require command, and can now, as usual, use the features of WordPress.

Blocking IE

I never like IE. It's slow. It has broken CSS and Javascript support. Its security is compromised. And a host of other reasons.

And because my blog looks ugly on it.

So I decided to block access to my blog through .htaccess and provide a suggestion to use other more standards compliant browsers. The following was my first attempt.


RewriteEngine on
RewriteCond %{HTTP_USER_AGENT} ^.*MSIE.*$
RewriteRule ^.* http://rumahfirman.com/noie.html [L]

So I intended to redirect the visitor using MSIE to noie.html where I write lines suggesting them to use other browsers. It created an endless loop. I then realised the problem. When accessing noie.html, the browser will first access rumahfirman.com and thus re-reading my .htaccess file. I then changed it to the following, which worked well.


RewriteEngine on
RewriteCond %{HTTP_USER_AGENT} ^.*MSIE.*$
RewriteRule ^.* http://noie.rumahfirman.com [L]

Plus, in the course of trying to find user agent string for IE, I found the following very nifty website. It lists user agent strings of all known user agents.

http://www.useragentstring.com/pages/useragentstring.php

Installing LAMP afresh, Enabling mod_rewrite, .htaccess

Somehow I screwed my PHP installation in Ubuntu so when I ran code to access mysql database through PHP, it spewed trash back to me. I then decided to start from a clean slate so I did this.

sudo apt-get --purge remove apache2 apache2-mpm-prefork apache2-utils apache2.2-common libapache2-mod-php5 libapr1 libaprutil1 libdbd-mysql-perl libdbi-perl libmysqlclient15off libnet-daemon-perl libplrpc-perl libpq5 mysql-client-5.0 mysql-common mysql-server mysql-server-5.0 php5-common php5-mysql

That will remove the whole LAMP stack. The keyword here is purge. There is a big difference between simply apt-get remove and apt-get --purge remove. The first will not delete any config file, so the next time you install the same package, the old config file will be used. The latter deletes everything. Just watch closely the console when you issue that command because sometimes it will give warning that says that it can not delete certain directories because they are not empty. In that case, you need to manually delete those directories.

After that, you need to reinstall apache php and mysql by issuing the following commands, in the given order:

sudo apt-get update

This updates your Ubuntu with current package information so when we type the next commands, it gets the most recent data.

sudo apt-get install php5 apache2 libapache2-mod-php5 mysql-server


sudo apt-get install php5-mysql

sudo apt-get install phpmyadmin

I did all that. And then I start my apache, I went into directory in which I have my CI installation. At this point, my DocumentRoot is pointing to /var/www while my CI installation is in /var/www/ci.

All went fine so far. Apache worked well. I then entered a dir in which I had PHP files. PHP files were downloaded by my Chrome browser, instead of being translated by Apache. So enable it:

sudo a2enmod php5

Try opening the PHP file again. Still fail! Then I opened Firefox and tried it again, and it worked. It seemes that Chrome cached this somehow.

All went fine. And then, I copied  a .htaccess file into the /var/www/ci directory. Bust, apache returned 500 internal server error! The fix: enabling mod rewrite by issuing this in command line:

a2enmod rewrite

And then see that you have mod_rewrite enabled when you run phpinfo(). But then, after I enabled the mod_rewrite, the server spat another error. This time it was 404 not found. I got it fixed by setting the DocumentRoot to /var/www/ci.

This is my .htaccess file:

RewriteEngine on
RewriteCond $1 !^(index\.php|images|robots\.txt)
RewriteRule ^(.*)$ /index.php/$1 [L]

I wondered what was going on so I went online and talked with a guy in #linux at dal.net. Here's the conversation:

(06:33:56 PM) arekmalang: Hi all
(06:34:31 PM) arekmalang: I have enabled the rewrite module in apache, but why does it fail when I have .htaccess file in a directory?
(06:35:44 PM) boredboy: ubuntu82: what happens? a 500 error returned, incorrect rules followed, etc etc. Need more info to help you out
(06:36:22 PM) arekmalang: 500 internal server error returned
(06:36:37 PM) arekmalang: oh wait
(06:36:52 PM) arekmalang: that was before i enabled the mod rewrite
(06:37:22 PM) arekmalang: after i enabled it, it returned 404 not found
(06:37:54 PM) arekmalang: if i remove the .htaccess file, then everything goes back to normal
(06:38:05 PM) boredboy: pastebin your .htaccess file
(06:38:11 PM) arekmalang: ok
(06:39:14 PM) arekmalang: here it is: http://linux.pastey.net/137178
(06:39:56 PM) arekmalang: It's a short .htaccess file in Code Igniter tutorial...
(06:41:06 PM) boredboy: so you're getting a 404?
(06:41:09 PM) arekmalang: yes
(06:41:25 PM) boredboy: I assume you have an index.php file?
(06:41:46 PM) arekmalang: yes
(06:41:50 PM) arekmalang: i do
(06:42:03 PM) arekmalang: It says it can't find the index.php
(06:42:32 PM) Tdot__ [~chatzilla@dsl-209-183-27-78.static.tor.primus.ca] entered the room.
(06:43:01 PM) arekmalang: Ha!
(06:43:03 PM) arekmalang: Solved!
(06:43:42 PM) ***boredboy goes back to sleep
(06:43:43 PM) arekmalang: The document root in apache config file needs to be set to the directory where the index.php resides...
(06:43:52 PM) arekmalang: But why so?
(06:44:05 PM) arekmalang: boredboy...
(06:44:10 PM) arekmalang: wake up :)
(06:44:14 PM) arekmalang: enlighten me
(06:46:08 PM) boredboy: huh? which bit don't you get? Your rewrite rule says that if it doesn't start with index.php, images or robots.txt rewrite everything to /index.php/$i
(06:46:24 PM) boredboy: er, $1 not $i
(06:46:40 PM) arekmalang: What I don't get is why I need to set the DocumentRoot to /var/www/ci to make it to work
(06:46:50 PM) arekmalang: Previously DocumentRoot was /var/www
(06:47:07 PM) arekmalang: the .htaccess and index.php are in /var/www/ci
(06:47:47 PM) boredboy: so to hit index.php you had to do http://mysite.com/ci/index.php ?
(06:48:18 PM) arekmalang: that is when docroot set to /var/www and without .htaccess
(06:48:35 PM) boredboy: you can try either one of these
(06:48:48 PM) arekmalang: now, to get to index php i have to go to http://localhost/ only
(06:49:10 PM) boredboy: change your rewrite to RewriteRule ^(.*)$ /ci/index.php/$1 [L]
(06:49:27 PM) boredboy: or RewriteRule ^(.*)$ index.php/$1 [L]
(06:49:38 PM) Tdot_ left the room (quit: Read error: Operation timed out).
(06:49:49 PM) boredboy: if you have the preceeding / you will always try get the index.php in your doc root
(06:50:03 PM) _null is now known as null
(06:50:33 PM) arekmalang: Ahhhh that's it
(06:50:40 PM) arekmalang: Thanks a lot, master!
(06:51:17 PM) boredboy: no problem....., back to sleep

So.... the problem lies in my .htaccess file :) Thanks, boredboy. Well, yeah, that's my adventure for the day :))

Updating to JDK release 20

OK, after manually updating my JDK three times, which is painstaking on my Jaunty Jackalope machine, I finally got the hang of how to do it. Or at least so I thought. So, basically, the steps are as follow:
  1. Download the JDK bin installer from Sun's (or now, Oracle's) site.
  2. Put it in /usr/lib/jvm and execute it, which basically will unzip it.
  3. Rename the resulting directory to follow the naming patterns of other directories of JDK of other versions.
  4. Create the .jinfo file. Just copy paste the .jinfo from other version, change the directory, change the name, and change the priority number. Newer version should be assigned less priority number. (The more the priority number is, the less prioritized it is).
  5. Call update-java-alternatives -l and see if your newly installed java is listed. If so, then call update-java-alternatives -s , and then see that you don't get "Can not update" message. If you do, and that was what happened to me, solution in the end of this post.
  6. Locate all java plugins for Mozilla and delete them all, save the ones under /usr/lib/jvm. Not surprisingly, there is a linux command called "locate" to do that. But funnily, it is only yesterday that I found out about it. So basically you would want to call this command (without the quotes): "locate libnpjp2.so libjavaplugin_oji.so pluginreg.dat", and then note the directory names because you are going to need them later, and then delete all of them but not the ones under /usr/lib/jvm.
  7. Go to mozilla plugin directories (the ones you took note in step 6) and re-create the symlink to java plugin which is located in /lib/i386/libnpjp2.so. This is the command that you need (again, without the quotes): "ln -s /lib/i386/libnpjp2.so . " Remember to do this for each plugin that you deleted in step 6. That is, for each libnpjp2.so and libjavaplugin_oji.so file. And then check that you firefox has updated its plugin by doing step 8.
  8. Re-start firefox and then in the address bar type: "about:plugins". (Without the quotes). Scroll and see that you have the Java (TM) plugin of the correct version.
If you did all the above steps and still something went awry, well... tinker, google, may God help you. Oh yeah, sometimes running update-java-alternatives gives you a horror message of "can not update...". It turned out that simply making .jinfo file sometimes does not update the information or... something to that effect. I do not really understand how this update mechanism works. But fortunately, someone from Ubuntu forum made a nifty shell script to execute to before calling update-java-alternatives and the script really saved my day. The following is the script:

#!/bin/sh
update-alternatives --install /usr/bin/ControlPanel ControlPanel /usr/lib/jvm/java-6-sun-1.6.0.20/jre/bin/ControlPanel 60
update-alternatives --install /usr/bin/java java /usr/lib/jvm/java-6-sun-1.6.0.20/jre/bin/java 60
update-alternatives --install /usr/bin/java_vm  java_vm /usr/lib/jvm/java-6-sun-1.6.0.20/jre/bin/java_vm 60
update-alternatives --install /usr/bin/javaws  javaws /usr/lib/jvm/java-6-sun-1.6.0.20/jre/bin/javaws 60
update-alternatives --install /usr/bin/jcontrol  jcontrol /usr/lib/jvm/java-6-sun-1.6.0.20/jre/bin/jcontrol 60
update-alternatives --install /usr/bin/keytool  keytool /usr/lib/jvm/java-6-sun-1.6.0.20/jre/bin/keytool 60
update-alternatives --install /usr/bin/pack200  pack200 /usr/lib/jvm/java-6-sun-1.6.0.20/jre/bin/pack200 60
update-alternatives --install /usr/bin/policytool  policytool /usr/lib/jvm/java-6-sun-1.6.0.20/jre/bin/policytool 60
update-alternatives --install /usr/bin/rmid  rmid /usr/lib/jvm/java-6-sun-1.6.0.20/jre/bin/rmid 60
update-alternatives --install /usr/bin/rmiregistry  rmiregistry /usr/lib/jvm/java-6-sun-1.6.0.20/jre/bin/rmiregistry 60
update-alternatives --install /usr/bin/unpack200  unpack200 /usr/lib/jvm/java-6-sun-1.6.0.20/jre/bin/unpack200 60
update-alternatives --install /usr/bin/orbd  orbd /usr/lib/jvm/java-6-sun-1.6.0.20/jre/bin/orbd 60
update-alternatives --install /usr/bin/servertool  servertool /usr/lib/jvm/java-6-sun-1.6.0.20/jre/bin/servertool 60
update-alternatives --install /usr/bin/tnameserv  tnameserv /usr/lib/jvm/java-6-sun-1.6.0.20/jre/bin/tnameserv 60
update-alternatives --install /usr/bin/HtmlConverter  HtmlConverter /usr/lib/jvm/java-6-sun-1.6.0.20/bin/HtmlConverter 60
update-alternatives --install /usr/bin/appletviewer  appletviewer /usr/lib/jvm/java-6-sun-1.6.0.20/bin/appletviewer 60
update-alternatives --install /usr/bin/apt  apt /usr/lib/jvm/java-6-sun-1.6.0.20/bin/apt 60
update-alternatives --install /usr/bin/extcheck  extcheck /usr/lib/jvm/java-6-sun-1.6.0.20/bin/extcheck 60
update-alternatives --install /usr/bin/idlj  idlj /usr/lib/jvm/java-6-sun-1.6.0.20/bin/idlj 60
update-alternatives --install /usr/bin/jar  jar /usr/lib/jvm/java-6-sun-1.6.0.20/bin/jar 60
update-alternatives --install /usr/bin/jarsigner  jarsigner /usr/lib/jvm/java-6-sun-1.6.0.20/bin/jarsigner 60
update-alternatives --install /usr/bin/java-rmi.cgi  java-rmi.cgi /usr/lib/jvm/java-6-sun-1.6.0.20/bin/java-rmi.cgi 60
update-alternatives --install /usr/bin/javac  javac /usr/lib/jvm/java-6-sun-1.6.0.20/bin/javac 60
update-alternatives --install /usr/bin/javadoc  javadoc /usr/lib/jvm/java-6-sun-1.6.0.20/bin/javadoc 60
update-alternatives --install /usr/bin/javah  javah /usr/lib/jvm/java-6-sun-1.6.0.20/bin/javah 60
update-alternatives --install /usr/bin/javap  javap /usr/lib/jvm/java-6-sun-1.6.0.20/bin/javap 60
update-alternatives --install /usr/bin/jconsole  jconsole /usr/lib/jvm/java-6-sun-1.6.0.20/bin/jconsole 60
update-alternatives --install /usr/bin/jdb  jdb /usr/lib/jvm/java-6-sun-1.6.0.20/bin/jdb 60
update-alternatives --install /usr/bin/jhat  jhat /usr/lib/jvm/java-6-sun-1.6.0.20/bin/jhat 60
update-alternatives --install /usr/bin/jinfo  jinfo /usr/lib/jvm/java-6-sun-1.6.0.20/bin/jinfo 60
update-alternatives --install /usr/bin/jmap  jmap /usr/lib/jvm/java-6-sun-1.6.0.20/bin/jmap 60
update-alternatives --install /usr/bin/jps  jps /usr/lib/jvm/java-6-sun-1.6.0.20/bin/jps 60
update-alternatives --install /usr/bin/jrunscript  jrunscript /usr/lib/jvm/java-6-sun-1.6.0.20/bin/jrunscript 60
update-alternatives --install /usr/bin/jsadebugd  jsadebugd /usr/lib/jvm/java-6-sun-1.6.0.20/bin/jsadebugd 60
update-alternatives --install /usr/bin/jstack  jstack /usr/lib/jvm/java-6-sun-1.6.0.20/bin/jstack 60
update-alternatives --install /usr/bin/jstat  jstat /usr/lib/jvm/java-6-sun-1.6.0.20/bin/jstat 60
update-alternatives --install /usr/bin/jstatd  jstatd /usr/lib/jvm/java-6-sun-1.6.0.20/bin/jstatd 60
update-alternatives --install /usr/bin/native2ascii  native2ascii /usr/lib/jvm/java-6-sun-1.6.0.20/bin/native2ascii 60
update-alternatives --install /usr/bin/rmic  rmic /usr/lib/jvm/java-6-sun-1.6.0.20/bin/rmic 60
update-alternatives --install /usr/bin/schemagen  schemagen /usr/lib/jvm/java-6-sun-1.6.0.20/bin/schemagen 60
update-alternatives --install /usr/bin/serialver  serialver /usr/lib/jvm/java-6-sun-1.6.0.20/bin/serialver 60
update-alternatives --install /usr/bin/wsgen  wsgen /usr/lib/jvm/java-6-sun-1.6.0.20/bin/wsgen 60
update-alternatives --install /usr/bin/wsimport  wsimport /usr/lib/jvm/java-6-sun-1.6.0.20/bin/wsimport 60
update-alternatives --install /usr/bin/xjc  xjc /usr/lib/jvm/java-6-sun-1.6.0.20/bin/xjc 60
update-alternatives --install /usr/bin/jexec  jexec /usr/lib/jvm/java-6-sun-1.6.0.20/jre/lib/jexec 60
update-alternatives --install /usr/lib/mozilla-firefox/plugins/libnpjp2.so libnpjp2.so /usr/lib/jvm/java-6-sun-1.6.0.20/jre/lib/i386/libnpjp2.so 60

Update Feb 20, 2011:
So just now I tried to update it again to JDK 6 update 24. I followed the above procedure, but my Firefox plugins still won't update. I did the following:

  1. I deleted the Java plugin symlinks in mozilla firefox home directory and replace them with the new ones pointing to Java 6 u 24.
  2. I deleted the Java plugin symlinks in mozilla firefox home directory and DIDN'T REPLACE THEM.
I tried the above 2, and the Java plugins for Firefox still point to update 22. Even after I deleted them and did not replace them. So it seems to me that those symlinks do not server any purpose whatsoever on my system. I then returned to /usr/lib/jvm and did ls -al. There I noticed a symlink java-6-sun which pointed to java-6-sun-1.6.0.22. I then changed it to point to java-6-sun-1.6.0.24. And voila! Firefox plugins are now pointing to update 24! And I haven't added symlinks pointing to Java plugins in mozilla firefox home directory! So I guess the revised procedure to update Java is as follow:

  1. Do steps 1, 2, 3, 4 above.
  2. Run the above update-alternatives script.
  3. Do step 5 above.
  4. Change the symlink java-6-sun to point to the new updated Java directory.
That works for me, even though I don't quite understand what happens behind the scene.


Well, that's all for now folks :) References:
http://java.sun.com/javase/6/webnotes/install/jre/manual-plugin-install-linux.html
http://ubuntuforums.org/showthread.php?t=571257
http://mrinvader.blogspot.com/2010/05/stupid-effing-java.html

Litany of errors strike after manually updating


So, after I manually updated the JDK to release 19, as I wrote in this post, a series of errors strike me. First, I was unable to run my applet. It threw ExceptionInInitializer error. Then I had to revert to using JRE 16, as I wrote in this post. OK, running applet was resolved. But then, another error occurred. This time it happened when I built my project in Eclipse. I encountered KeyStoreException error when I tried to sign my applet. I then remember that I was still using the JRE 19 vm when invoking the Eclipse. OK, so I changed the run.sh of Eclipse to use JRE 16. I still could not sign my applet. So what went wrong? It turned out that I did not have JDK to go with JRE 19... or... something to that effect. So I looked around and stumbled upon this site, explaining how to update your JDK and JRE. This is a very simple process, compared to when I did it manually.

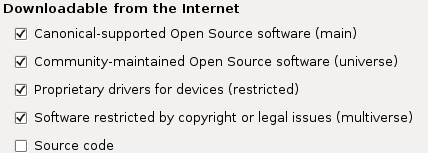
To install proprietary Java, you must have the Multiverse repository enabled. Click on System > Administration > Software Source > Select Multisource > Close


Open a shell prompt (terminal) and type the following to install JDK and JRE:
$ sudo apt-get install sun-java6-bin sun-java6-jre sun-java6-jdk
Setup the default Java version

Ubuntu Linux comes with update-java-alternatives utility to updates all alternatives belonging to one runtime or development kit for the Java language. To select, Sun's JVM as provided in Ubuntu 7.10, enter:
$ sudo update-java-alternatives -s java-6-sun
You also need to edit a file called /etc/jvm. This file defines the default system JVM search order. Each JVM should list their JAVA_HOME compatible directory in this file. The default system JVM is the first one available from top to bottom. Open /etc/jvm
$ sudo vi /etc/jvm
Make sure /usr/lib/jvm/java-6-sun is added to the top of JVM list
/usr/lib/jvm/java-6-sun
At the end your file should read as follows:
/usr/lib/jvm/java-6-sun
/usr/lib/jvm/java-gcj
/usr/lib/jvm/ia32-java-1.5.0-sun
/usr/lib/jvm/java-1.5.0-sun
/usr
Save and close the file.
Setup the environment variable

You also need to setup JAVA_HOME and PATH variable. Open your $HOME/.bash_profile or /etc/profile (system wide) configuration. Open your .bash_profile file:
$ vi $HOME/.bash_profile
Append following line:
export JAVA_HOME=/usr/lib/jvm/java-6-sun
export PATH=$PATH:$JAVA_HOME/bin
Save and close the file.
Test your new JDK

Type the following command to display version:
$ java -version
Output:

java version "1.6.0_03"
Java(TM) SE Runtime Environment (build 1.6.0_03-b05)
Java HotSpot(TM) Server VM (build 1.6.0_03-b05, mixed mode)

Try HelloWorld.java - first java program

$ vi HelloWorld.java
Append code:

public class HelloWorld {
    public static void main(String[] args) {
        System.out.println("Hello, World!");
    }
}

Save and close the file. Compile HelloWorld.java and execute program by typing following two instructions:
$ javac HelloWorld.java
$ java HelloWorld

Output:

Hello, World!

Find file with certain title, make bash re-read the .bashrc

Make bash re-read the config file .bashrc, type the following:

. .bashrc


Note the space between the dots.

Find file with certain title:

find / -name "filename" -print

java.lang.ExceptionInInitializerError after manually updating Java

OK, after I did the manual updating as was explained in the last post, I was unable to run my applet. The Java Console throws java.lang.ExceptionInInitializerError error. I did not know what went wrong.
After googling, I arrived at the following information.
#
Run sudo update-java-alternatives -l to see the current configuration and possibilities.
#
Run sudo update-java-alternatives -s XXXX to set the XXX java version as default. For Sun Java 6 this would be sudo update-java-alternatives -s java-6-sun
#
Run java -version to ensure that the correct version is being called.
I ran the command, and the following was the result on my console:
java-6.19-sun 60 /usr/lib/jvm/java-6.19-sun
java-6-sun 63 /usr/lib/jvm/java-6-sun
java-gcj 1042 /usr/lib/jvm/java-gcj
java -version shows:
Java(TM) SE Runtime Environment (build 1.6.0_19-b04)
Java HotSpot(TM) Server VM (build 16.2-b04, mixed mode)

So, my manual installation works. But why does running applets throw the above error? So I decided to revert to java-6-sun. And the exception does not show again. What went wrong?