
Integrating Level Helper to hybrid project iOS+Android using Cocos2d-x
The wonder of Cocos2dx is: it's written in C++. And because it's written in C++, it can run on any system that supports C++. That means all systems, except Windows phone (as of this writing).
To integrate Level Helper to hybrid iOS Android Cocos2d-x project (common C++ codes for both iOS and Android), first create hybrid project as is explained in this post: http://growingshoot.blogspot.com/2013/04/cocos2dx-hybrid-project-ios-and-android.html
>> The trick to integrate Level Helper <<
Most Android does not support pvr.ccz, while most (or all?) iPhones support it. I want pvr.ccz for iPhone project, and plain PNG for Android project. pvr.ccz for iPhone project is even more compelling because most of the time, the PNG generated by SpriteHelper causes pngcrush caught libpng error on compile time, while the same PNG file does not cause trouble for Android.
To achieve that, I create the Sprite Helper project, and save the pvr.ccz version inside {PROJECT_NAME}/Resources directory and save the PNG version inside {PROJECT_NAME}/android/assets directory. Then, I create the Level Helper project inside {PROJECT_NAME}/Resources directory.
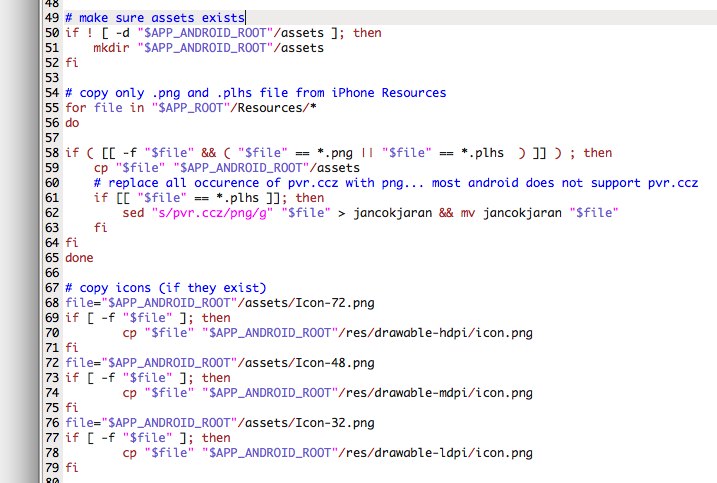
The {PROJECT_NAME}/android/build_native.sh needs modification so it does not delete the assets directory and replace it with contents of Resources directory. It also must copy only PNG and plhs (project file of Level Helper) from inside Resources directory into the assets directory. When copying plhs file, it must replace all occurences of pvr.ccz strings with png strings.
Following screenshots, respectively: saving Sprite Sheet for iPhone project (pvr.ccz, cocos2d-x resource handling, hd suffix set, 2x hd suffix empty), saving Sprite Sheet for Android project (png, cocos2d-x resource handling, hd suffix empty, 2x hd suffix empty), new build_native.sh file, old build_native.sh file.



2. Do not forget to set content scale factor to 2 in App Delegate! pDirector->setContentScaleFactor(2); You must also tell iPhone to look inside hd directory for files when in Retina mode: CCFileUtils::sharedFileUtils()->setResourceDirectory("hd"); This must be done before loading level. Can not be done in App Delegate!
3. C++ codes generated by Level Helper must be referenced in the {Project name}/android/jni/Android.mk file (LOCAL_SRC_FILES for the cpp files and LOCAL_C_INCLUDES for the headers). The following are my Android.mk file and my project structure (I put LevelHelper dir, which is codes generated by LevelHelper, under Classes dir).


To integrate Level Helper to hybrid iOS Android Cocos2d-x project (common C++ codes for both iOS and Android), first create hybrid project as is explained in this post: http://growingshoot.blogspot.com/2013/04/cocos2dx-hybrid-project-ios-and-android.html
>> The trick to integrate Level Helper <<
Most Android does not support pvr.ccz, while most (or all?) iPhones support it. I want pvr.ccz for iPhone project, and plain PNG for Android project. pvr.ccz for iPhone project is even more compelling because most of the time, the PNG generated by SpriteHelper causes pngcrush caught libpng error on compile time, while the same PNG file does not cause trouble for Android.
To achieve that, I create the Sprite Helper project, and save the pvr.ccz version inside {PROJECT_NAME}/Resources directory and save the PNG version inside {PROJECT_NAME}/android/assets directory. Then, I create the Level Helper project inside {PROJECT_NAME}/Resources directory.
The {PROJECT_NAME}/android/build_native.sh needs modification so it does not delete the assets directory and replace it with contents of Resources directory. It also must copy only PNG and plhs (project file of Level Helper) from inside Resources directory into the assets directory. When copying plhs file, it must replace all occurences of pvr.ccz strings with png strings.
Following screenshots, respectively: saving Sprite Sheet for iPhone project (pvr.ccz, cocos2d-x resource handling, hd suffix set, 2x hd suffix empty), saving Sprite Sheet for Android project (png, cocos2d-x resource handling, hd suffix empty, 2x hd suffix empty), new build_native.sh file, old build_native.sh file.
New build_native.sh below and old build_native.sh above:
2. Do not forget to set content scale factor to 2 in App Delegate! pDirector->setContentScaleFactor(2); You must also tell iPhone to look inside hd directory for files when in Retina mode: CCFileUtils::sharedFileUtils()->setResourceDirectory("hd"); This must be done before loading level. Can not be done in App Delegate!
3. C++ codes generated by Level Helper must be referenced in the {Project name}/android/jni/Android.mk file (LOCAL_SRC_FILES for the cpp files and LOCAL_C_INCLUDES for the headers). The following are my Android.mk file and my project structure (I put LevelHelper dir, which is codes generated by LevelHelper, under Classes dir).
