Tampilkan postingan dengan label Android. Tampilkan semua postingan

Integrating Level Helper to hybrid project iOS+Android using Cocos2d-x

The wonder of Cocos2dx is: it's written in C++. And because it's written in C++, it can run on any system that supports C++. That means all systems, except Windows phone (as of this writing).

To integrate Level Helper to hybrid iOS Android Cocos2d-x project (common C++ codes for both iOS and Android), first create hybrid project as is explained in this post: http://growingshoot.blogspot.com/2013/04/cocos2dx-hybrid-project-ios-and-android.html

>> The trick to integrate Level Helper <<

Most Android does not support pvr.ccz, while most (or all?) iPhones support it. I want pvr.ccz for iPhone project, and plain PNG for Android project. pvr.ccz for iPhone project is even more compelling because most of the time, the PNG generated by SpriteHelper causes pngcrush caught libpng error  on compile time, while the same PNG file does not cause trouble for Android.

To achieve that,  I create the Sprite Helper project, and save the pvr.ccz version inside {PROJECT_NAME}/Resources directory and save the PNG version inside {PROJECT_NAME}/android/assets directory. Then, I create the Level Helper project inside {PROJECT_NAME}/Resources directory.

The {PROJECT_NAME}/android/build_native.sh needs modification so it does not delete the assets directory and replace it with contents of Resources directory. It also must copy only PNG and plhs (project file of Level Helper) from inside Resources directory into the assets directory. When copying plhs file, it must replace all occurences of pvr.ccz strings with png strings.

Following screenshots, respectively: saving Sprite Sheet for iPhone project (pvr.ccz, cocos2d-x resource handling, hd suffix set, 2x hd suffix empty), saving Sprite Sheet for Android project (png, cocos2d-x resource handling, hd suffix empty, 2x hd suffix empty), new build_native.sh file, old build_native.sh file.


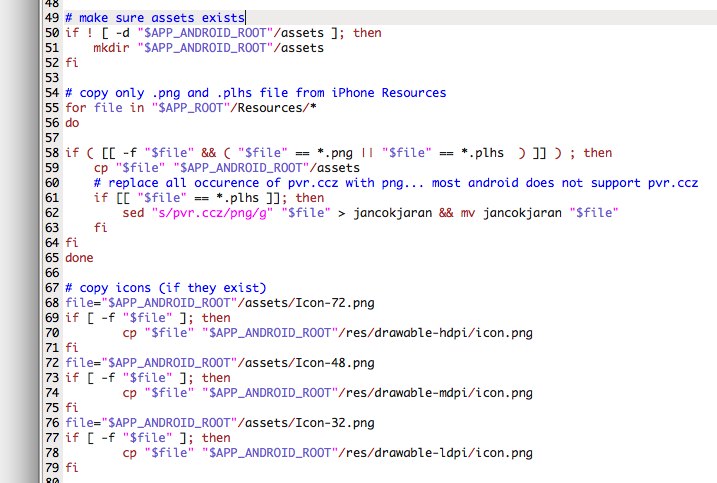


New build_native.sh below and old build_native.sh above:


2. Do not forget to set content scale factor to 2 in App Delegate!     pDirector->setContentScaleFactor(2); You must also tell iPhone to look inside hd directory for files when in Retina mode: CCFileUtils::sharedFileUtils()->setResourceDirectory("hd"); This must be done before loading level. Can not be done in App Delegate!

3. C++ codes generated by Level Helper must be referenced in the {Project name}/android/jni/Android.mk file (LOCAL_SRC_FILES for the cpp files and LOCAL_C_INCLUDES for the headers). The following are my Android.mk file and my project structure (I put LevelHelper dir, which is codes generated by LevelHelper, under Classes dir).


Cocos2dx hybrid project iOS and Android

So I'm porting a game from iOS to Android. It's a Cocos2d game. Naturally I look to implementing the Android port using Cocos2dX, since it's a C++ port of Cocos2d.
I found many tutorials online of how to create a shared project for Android and iOS. By "shared", I mean the C++ code. The C++ code is common to iOS and Android. With some Objective-C code binding for the iOS project and some Java code for the Android project.
But the Objective-C and Java codes are small and do not change.
The ones that change is the C++ codes, shared by iOS and Android project.
Among all tutorials online, I find this one most concise and easy to follow: http://www.bold-it.com/ios/cocos2d-x-box2d-iosandroid-hybrid-tutorial/

It's just that the tutorial is written for Cocos2d-2.0-x-2.0.2. The most current version as of this writing is Cocos2d-2.0-x-2.0.4.
Only minor version change but I had to make some extra adjustment to compile and run both project successfully.

So, follow the steps in the above tutorial:
1. Download Cocos2dx.
2. Install the XCode template: ./install-templates-xcode.sh
3. Create XCode project for iOS.
4. Edit the create-android-project.sh file before creating the Android project. Set the NDK_ROOT_LOCAL and ANDROID_SDK_ROOT_LOCAL variables.
5. Execute create-android-project.sh --box2d to create Android box2D project.
6. Make sure it compiles by executing ./build_native.sh
7. Move the necessary Android files:

  • Move the /testgame/proj.android folder to the iphone project folder, next to ios. Rename it android.
  • Copy the /external/Box2D folder into /libs/, replace what is there.
  • Copy the /cocos2dx folder into /libs/, replace what is there.
  • Copy the /CocosDenshion/android folder into /libs/CocosDenshion/
  • Copy the /extensions folder to /libs/, replace what is there.
8. In /android/build_native.sh, change line 40: COCOS2DX_ROOT="$DIR/../libs"
9. Next, in android/jni/Android.mk, add a LOCAL_C_INCLUDES path to Box2D and change “$(call import-module,external/Box2D)” to “$(call import-module,Box2D)”. To be able to see logs in Logcat, add LOCAL_CFLAGS += -DCOCOS2D_DEBUG=1. Delete this line or set the value to 0 for production to improve efficiency.
This is how my Android.mk looks like:

After the log is enabled, you can see the log output from console by typing: adb logcat | grep D/cocos2d-x. Don't forget to use CCLOG to print debugging messages.
10. Update android.library.reference.1 in android/project.properties:

# Project target.
target=android-10
android.library.reference.1=../libs/cocos2dx/platform/android/java
11. Define sdk.dir in libs/cocos2dx/platform/android/java/ant.properties as such:
sdk.dir=/Users/firman/Documents/android-sdk-macosx
12. Edit the target in libs/cocos2dx/platform/android/java/project.properties to match the target defined in android/project.properties:
target=android-10

Done! Now you can run the iOS project from inside XCode. As for the Android project:


./build_native.sh clean
./build_native.sh
ant debug
adb install -r bin/testgame-debug.apk
adb shell am start -a android.intent.action.MAIN -n com.boldit.testgame/.testgame

Getting LG L5 to be recognized by ADB on Ubuntu

I never had problem with my Samsung Galaxy W. I connected it to my Ubuntu, I issued adb install on the terminal, and everything went smoothly. Not a single problem.

Then I needed to upgrade to ICS. Samsung Galaxy wouldn't let me upgrade from Gingerbread to ICS. SO I bought LG L5 with ICS.

I connected LG L5 to my Ubuntu, issued adb install and....
adb spat this back to me:

error: insufficient permissions for device 

What went wrong???? I issued adb devices to list the Android devices latched to my Ubuntu. It gave me this:

List of devices attached 
????????????        no permissions 

So my LG is not recognized by Ubuntu. It turns out that you need to create udev file for every device that you are using. So you need to create this file as root: /etc/udev/rules.d/lg-android.rules

The file name is arbitrary, just as long as it ends with .rules extension. Use descriptive file name. In that directory I have lg-android.rules and htc-android.rules files. Add this line to the file:

SUBSYSTEM=="usb", ATTR{idVendor}=="1004", MODE="0777"

The number 0bb4 is manufacturer ID and must be replaced by the manufacturer ID of your device. List follows. And mode is the permission. I set it to 0777 just to make sure every body can execute, write to and read from the device.

Then save the file, and set its permission to be executable and readable by all.

sudo chmod a+rx /etc/udev/rules.d/70-android.rulessd

Then unplug the device, plug it again and issue adb devices again. If your device is not listed, wait a few minutes and issue adb devices again. Should be listed now. Otherwise, I don't know what's gone wrong. :p
One more thing, I need to set my LG L5 connectivity to Media sync (MTP) and enable USB debugging. MTP basically tells my device to act like USB thumb drive.

Following is the result of adb devices issued on my Ubuntu terminal after the above steps are conducted:


List of devices attached
LGOTMSe8ae1617 device


What baffles me is that, why does Samsung get recognized right away, and why does my LG L5 gets recognized automatically on Mac? All the above steps are absolutely unnecessary on Mac...

MANUFACTURERUSB VENDOR ID
Acer0502
Dell413c
Foxconn0489
Garmin-Asus091E
HTC (Older Phones)0bb4
HTC (Newer phones)18d1
Huawei12d1
Kyocera0482
LG1004
Motorola22b8
Nexus One/S18d1
Nvidia0955
Pantech10A9
Samsung04e8
Sharp04dd
Sony Ericsson0fce
ZTE19D2
Ref:
http://esausilva.com/2010/05/13/setting-up-adbusb-drivers-for-android-devices-in-linux-ubuntu/

Compile linphone for Android

Compiling linphone has always been a challenge for me. Even after following the README down to each letter, I always get errors. Compiling linphone for Android is no difference.

So I followed the README, got everything installed, and did make.

And I ended up with numerous such errors:

Fatal error: invalid -march= option: `armv5te'

After a while, I figured out that it was caused by failure in cross compilation. So linphone uses a lot of libraries written for intel (desktop) processors. Those libraries need to be cross compiled for ARM. I failed at this stage.

So to summarize, the following are the steps needed to compile linphone for Android. These steps are taken from the README, with my comments inside the parentheses.
(My OS is Ubuntu 12).

0) download the Android sdk with platform-tools and tools updated to latest revision (at least API 16 is needed), then add both 'tools' and 'platform-tools' folders in your path.
1) download the Android ndk (>=r8b) from google and add it to your path.
2) install the autotools: autoconf, automake, aclocal, libtoolize pkgconfig (On my Ubuntu, aclocal is part of automake. pkgconfig is in a package called pkg-config and already installed. libtoolize is in a package called libtool. So actually I had to: sudo apt-get install automake autoconf libtool)
3) install the code sourcery toolchain. This step is crucial as the toolchain is needed for succesful cross compilation. This step is not mentioned in the README!!!!

So to install the sourcery toolchain, do these steps:
1. Get the binary from sourcery.mentor.com. Get the binary for Linux, not the source, to save you from compilation headache. The filename is: arm-2008q3-72-arm-none-linux-gnueabi-i686-pc-linux-gnu.tar.bz2. You have to register, agree to some formalities, and then download it.
2. Unzip it. Preferable to a subdir inside the /opt dir to make it look pro.
3. Add path to the bin directory inside the unzipped directory to your path.

And then, done. Follow the readme to make and make install and you'll compile with success.

ADB not recognized on newly installed Ubuntu 12.10

I just installed latest Ubuntu (12.10) on my office computer running Win 7. Problems soon appear.

The first is that from time to time the desktop became totally unresponsive. Paralyzed. I had to wait for a few minutes until my mouse clicks did anything at all.
After looking at top, I found out that the process mount.ntfs occupied 100% of CPU. So I got windows partition mounted and Ubuntu was doing something to it that hogged the resources. I don't know how to solve this... I installed this Ubuntu from Windows initially.

And then I needed to put Eclipse to the Unity launcher. Unity launcher is a vertical container of icons on the left side of the desktop, as in following picture:

How: 
1. Create a file with .desktop extension, containing info like this:

[Desktop Entry]
Version=
Name=Eclipse
Comment=
Exec=/home/switchlab/Documents/bin/eclipse/eclipse
Icon=/home/switchlab/Documents/bin/eclipse/icon.xpm
Terminal=false
Type=Application
Categories=Application;

2. Put it in /usr/share/applications
3. In Dash Home, search for Eclipse and then drag and drop it to launcher.

I installed Android SDK, but then I failed to run adb eventhough I got it on my PATH. The error message said: No such file or directory. This is very weird. I checked that the adb did exist in platform-tools. So why this message? 

It turned out that this is caused by a glitch on my Ubuntu 64 bit installation. I had to do:
sudo dpkg --add-architecture i386 && sudo apt-get update && sudo apt-get install ia32-libs

and everything worked fine again. I still haven't got a clue what that command does. Anyway, thanks goes to Scotty Delicious who wrote it here: http://askubuntu.com/questions/219465/cannot-install-ia32-lib-package

Android SDK update

Updating Android SDK via Eclipse interface requires that your internet connection be stable. If in the middle of the download your connection is interrupted, you have to start over.
Yet, you can actually use download manager (which cache files and resume download from where you left off) when downloading SDK. Here's how:

Inspect the log window when you start the Android SDK Manager (it's the paper icon next to the tiny red square button). In the log, you can find the XML containing information about your download. Inspect the XML, and download whatever part of the SDK that you need.

Rooting Galaxy W

So here was my situation.

I got Galaxy W. Unrooted. Android Gingerbread 2.3.6. I needed to tinker with the new Google ADK. Google ADK, with the Android device acting as the USB accessory, require that Android 2.3.4 be installed as the minimum.
But then again, not all Android device with 2.3.4 version support USB accessory function. There has to be a certain file in the Android file system for it to support ADK. And my Galaxy W does not have it.
I could install those files manually but I needed to have root access on my Android. I needed to root my phone.

Here's how:

http://forum.xda-developers.com/showthread.php?t=1317394

1. Download this Zip-file copy this into the internal SD card.

2. While switched off, keep the following buttons pressed. Release the power-button once the Samsung Galaxy W(I8150) is switched on.


As soon as you see the Android with the box, release the Home- and Volume Up-button.

After you hit the menu-button shown on the last image, the screen will gray out, you will have to wait until the recovery menu appears.

3. Navigate with the volume up and down to apply sdcard:update.zip in Recovery Menu. To confirm your selection use the home-button.

4. Choose (with volume buttons) the update.zip file on your internal sd card and confirm again with Home-button. You will have to wait 5 seconds.

5. Now choose reboot system now and confirm with home button.

Now you device should be rooted.

Just in the case the website goes down or disappear for some reason, I copy it here. I got the zip file too, in case you need it.

When you do adb shell and get into Android file system, you can now do: su and get root privilege. But there are many commands which are not available on standard Android installation. One very important command missing being: cp. The copy command. Solution: install busybox. Copy the file into sdcard. Now everytime you want to execute copy, you can do: busybox cp ....

One more thing, before you can copy files to the system directory, you need to mount it as RW.

mount -o rw,remount -t yaffs2 /dev/block/mtdblock3 /system

That's it!

How to clone Android repo

mkdir android 
cd android
repo init -u git://android.git.kernel.org/platform/manifest.git 
repo sync
make

http://twitter.com/Arubin/status/27808662429