
Litany of errors strike after manually updating
So, after I manually updated the JDK to release 19, as I wrote in this post, a series of errors strike me. First, I was unable to run my applet. It threw ExceptionInInitializer error. Then I had to revert to using JRE 16, as I wrote in this post. OK, running applet was resolved. But then, another error occurred. This time it happened when I built my project in Eclipse. I encountered KeyStoreException error when I tried to sign my applet. I then remember that I was still using the JRE 19 vm when invoking the Eclipse. OK, so I changed the run.sh of Eclipse to use JRE 16. I still could not sign my applet. So what went wrong? It turned out that I did not have JDK to go with JRE 19... or... something to that effect. So I looked around and stumbled upon this site, explaining how to update your JDK and JRE. This is a very simple process, compared to when I did it manually.
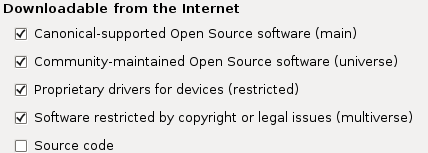
To install proprietary Java, you must have the Multiverse repository enabled. Click on System > Administration > Software Source > Select Multisource > Close
Open a shell prompt (terminal) and type the following to install JDK and JRE:
$ sudo apt-get install sun-java6-bin sun-java6-jre sun-java6-jdk
Setup the default Java version
Ubuntu Linux comes with update-java-alternatives utility to updates all alternatives belonging to one runtime or development kit for the Java language. To select, Sun's JVM as provided in Ubuntu 7.10, enter:
$ sudo update-java-alternatives -s java-6-sun
You also need to edit a file called /etc/jvm. This file defines the default system JVM search order. Each JVM should list their JAVA_HOME compatible directory in this file. The default system JVM is the first one available from top to bottom. Open /etc/jvm
$ sudo vi /etc/jvm
Make sure /usr/lib/jvm/java-6-sun is added to the top of JVM list
/usr/lib/jvm/java-6-sun
At the end your file should read as follows:
/usr/lib/jvm/java-6-sun
/usr/lib/jvm/java-gcj
/usr/lib/jvm/ia32-java-1.5.0-sun
/usr/lib/jvm/java-1.5.0-sun
/usr
Save and close the file.
Setup the environment variable
You also need to setup JAVA_HOME and PATH variable. Open your $HOME/.bash_profile or /etc/profile (system wide) configuration. Open your .bash_profile file:
$ vi $HOME/.bash_profile
Append following line:
export JAVA_HOME=/usr/lib/jvm/java-6-sun
export PATH=$PATH:$JAVA_HOME/bin
Save and close the file.
Test your new JDK
Type the following command to display version:
$ java -version
Output:
java version "1.6.0_03"
Java(TM) SE Runtime Environment (build 1.6.0_03-b05)
Java HotSpot(TM) Server VM (build 1.6.0_03-b05, mixed mode)
Try HelloWorld.java - first java program
$ vi HelloWorld.java
Append code:
public class HelloWorld {
public static void main(String[] args) {
System.out.println("Hello, World!");
}
}
Save and close the file. Compile HelloWorld.java and execute program by typing following two instructions:
$ javac HelloWorld.java
$ java HelloWorld
Output:
Hello, World!
0 komentar:
Posting Komentar