Upgrading Mac RAM

I have Virtualbox running CentOS on my Mac, on which i have Oracle XE running (since there`s no Oracle XE for Mac). In addition to that, I have Eclipse, SQL Developer, Chrome, Firefox (both with gwt plugin) running. With only 4GB of RAM, this set up brought my Mac its knees.

I clearly needed to upgrade my RAM.

I notice that Mac has 4 memory slots. 2 are already occupied by default by 2 memory modules, each 2 GB. I bought another 2 modules, each 4 GB, tried to insert them to the vacant slots... and it works! Now i have 12 GB RAM.

RAM manufacturers may vary, but keep frequency (mine is 1333 MHz) the same.


Installing Oracle Express 11g on CentOS

I tried to install Oracle Express 11g on CentOS following steps in this blog:

http://www.davidghedini.com/pg/entry/install_oracle_11g_xe_on

I installed successfully but i was unable to connect to the database. It kept giving me error:

ORA-01031: insufficient privileges

I found the answer in this forum: http://www.orafaq.com/forum/t/169798/0/

Summary:

yum install libaio bc flex net-tools
add your hostname to /etc/hosts
unzip oracle.zip
cd Disk1
rpm -ivh oracle.rpm
/etc/init.d/oracle-xe configure
usermod -a -G dba username (replace username with any username to access db)

all above must be run as root.

And then add envvar ORACLE_HOME and ORACLE_SID to user's ~/.bash_profile (case sensitive!)

export ORACLE_HOME=/u01/app/oracle/product/11.2.0/xe
export ORACLE_SID=XE

Also add oracle bin to the PATH:

PATH=$PATH:/u01/app/oracle/product/11.2.0/xe/bin

Restart, and now i can log in into sqlplus this way:

sqlplus / as sysdba

I tried to connect to db as user system with the password supplied during oracle-xe configure after installation, i get nasty error saying password invalid. I have to log in as sysdba and set the password of the user system (used in APEX):

alter user system identified by password

And now, setting ssh so i can access my centos from mac.
First check if sshd is already started and listening to port 22:

sudo netstat -tulpn | grep :22

If sshd is already started, then you should see sshd listed there, listening on port 22. If nothing shows up, then start sshd as root:

chkconfig sshd on
service sshd start

Add the following to /etc/sysconfig/iptables if not already present

-A input -m state --state NEW -m tcp -p tcp --dport 22 -j ACCEPT

And restart iptables

service iptables restart

To connect with SSH from mac host to centos guest virtualbox, activate adapter 2 in virtualbox -> settings -> network.

http://aruljohn.com/info/virtualbox-access-guest-from-host-nat/

Choose host only adapter for adapter 2. In the name drop down list, if none is already present, create one from virtualbox preference.

When this is done, run ifconfig as root from inside centos to find out the ip address to connect to. In my case, the ip address is 192.168.56.102.

Now i can ssh to my centos from my mac.

Open port for Application Manager/Apex and ORCL db. These ports are defined in oracle-xe configure after installation. Add entries in iptables (in my case, apex at 10001 and ORCL db at 1521):

-A input -m state --state NEW -m tcp -p tcp --dport 10001 -j ACCEPT
-A input -m state --state NEW -m tcp -p tcp --dport 1521 -j ACCEPT

Restart iptables:

service iptables restart.

Now i can access oracle db (thru SQL developer) and apex (http://192.168.56.102:10001/apex/f?p=4950) from my mac.

On a related thread, another story...
My mac has a meager RAM of only 4GB. I allocated 1 GB to the centos on virtualbox and when i fire up eclipse, firefox, and sql dev on mac host and oracle db on centos gues, my mac goes down to its knees.

I tried to prune the memory allocated to centos to half its installation size. centos still runs well, but ORCL would not start complaining:

ORA-01034: ORACLE not available ORA-27101: shared memory realm does not exist.

I tried to fiddle with SGA resizing (init.ora) but none works. I decided to do a fresh reinstall of centos and ORCL.

This time, i created centos virtual machine with RAM 512.

I booted it with centos live CD iso. When i get to the desktop, i clicked "install to hard disk" icon. But nothing happened. I learned later that centos would not install thru GUI at 512 MB RAM. So i had to sudo and run the executable symlinked by the install to hard disk icon.

I got a centos installation without GUI. Oracle installation succeeded, but sqlplus would not start with error message of inssuficient permission. I would be happy to have CLI centos and lean ORCL on it, but i simply did not have time to fiddle to get it to work. So i decided to reinstall centos with 768 MB. GUI installation worked, and i get to the above steps.

I will try to find out what cause ORCL to refuse to start when in centos no GUI mode. When i have time. Which is very likely never going to happen. .-))

How to install a jar manually in local maven repository


Problem Statement: Your pom.xml dependencies is not able to download a certain jar from the repository.
Solution:
You can manually download the jar and add it to your local maven repository.
Assuming this dependency (mentioned in pom.xml) fails (because the jar fails to download):

org.hibernate
hibernate-entitymanager
3.3.2.GA

Then download hibernate-entitymanager-3.3.2.GA manually, and run the command:
mvn install:install-file -DgroupId=org.hibernate -DartifactId=hibernate-entitymanager -Dversion=3.3.2.GA -Dpackaging=jar -Dfile=./hibernate-entitymanager-3.3.2.GA.jar
Thats it, you are all set.
From:
http://qnatech.wordpress.com/2011/07/26/how-to-install-a-jar-manually-in-local-maven-repository/

Meld on mac

In my previous life when Ubuntu was my only work station, both at the office and home, I used to have this cool setup: we committed our work (Java project) to a remote SVN repo. Every time someone did a commit, Hudson sent an email to everyone informing them of this commit, and then it did a build. And then Hudson sent email to everyone informing them whether the last commit built successfully or not.
Our email client was Evolution back then. Evolution had a very nifty diff plugin (emails from Hudson always content diff file), with code indentation and coloring. So when someone committed, or something broke, we could quickly see what was committed or what was going wrong (and who did it!).

Then we all moved to Mac workstations.... to start working on iOS projects. It was a pain to get Evolution and its nifty diff plugin to work on Mac. So we switched to Mac's native Mail app.

And we used an additional app to view the diff, which is meld. But this is still less than ideal, since now I had to switch to meld to view the diff. In Evolution, the diff was embedded in the mail, right below the email message, beautified by the diff plugin.

Recently I need to install meld on my private Mac. This was not so smooth (I don`t remember having problems back then). Anyway, here`s how to install meld on Mac via Macports:

$> sudo port install meld

Run meld. And then you may or may not get the following error:


File "/opt/local/bin/meld", line 75, in 

locale.setlocale(locale.LC_ALL,'')

File "/opt/local/Library/Frameworks/Python.framework/Versions/2.7/lib/python2.7/locale.py", line 539, in setlocale

return _setlocale(category, locale)

locale.Error: unsupported locale setting
If you do, do this:

export LANG=C; export LC_ALL=C
And then, if you get the following error:

glib.GError: Failed to contact configuration server; some possible causes are that you need to enable TCP/IP networking for ORBit, or you have stale NFS locks due to a system crash. See http://projects.gnome.org/gconf/ for information. (Details -  1: Failed to get connection to session: Not enough memory)
Do this:
$> sudo port notes dbus
$> sudo launchctl load -w /Library/LaunchDaemons/org.freedesktop.dbus-system.plist
$> launchctl load -w /Library/LaunchAgents/org.freedesktop.dbus-session.plist

From:
http://stackoverflow.com/questions/11892957/meld-on-os-x-10-7-doesnt-work
http://computercamp.cdwilson.us/running-meld-on-osx-107-lion

Smartfren errorId 702

Error 702: A connection to the remote computer could not be established…

How to solve:

  • Cabut usb modem anda
  • Buka command prompt (cmd) : Start > Run > Ketik CMD > Enter
  • Masukan perintah “netsh int ip reset c:\resetlog.txt” (tanpa petik) > enter
  • Restart komputer/laptop anda
  • Coba buat konek lagi..

Source:


Bean instances from Spring context must be cast into interface, not implementing class

So I have interface Thinker, and a class Volunteer implementing that interface.

I have a bean like this in my context.xml:


<bean id="thinker" class="springidol.classes.Volunteer"></bean>

And in the Java code:

Thinker vol = (Volunteer)context.getBean("thinker");

I got the following exception:

Exception in thread "main" java.lang.ClassCastException: com.sun.proxy.$Proxy1 cannot be cast to springidol.classes.Volunteer

It turns out that I must cast all beans instantiated from context into its interface, not its implementing class. The following Java code is correct:

Thinker vol = (Thinker)context.getBean("thinker");

Getting Apache Tomcat run via Eclipse to produce logs

Click on Servers tab, double click on the server instance to open it up in workspace. Then click Open Launch Configuration. Click on Arguments tab. You need to add the following two arguments:

-Djava.util.logging.manager=org.apache.juli.ClassLoaderLogManager -Djava.util.logging.config.file="/Users/firman/Documents/learnjava/apache-tomcat-7.0.40/conf/logging.properties"

Compile Freeswitch for Mac

To successfully compile and run freeswitch on Mac OS X Lion, the steps listed on http://wiki.freeswitch.org/wiki/Installation_on_OS_X_10.8_Mountain_Lion needs some modifications.

First, make sure you have gcc (by installing XCode) and GNU make tools (by installing thru mac ports or brew).

Then pull the freeswitch source from its git repo:


git clone git://git.freeswitch.org/freeswitch.git


Then get into the directory where you pulled freeswitch. Then do:

bootstrap.sh

Then:

configure

I got trouble here because the freeswitch configure script will fail to find the libjpeg even after i installed it thru brew or macports.

So I downloaded the libjpeg installed from http://ethan.tira-thompson.com/Mac_OS_X_Ports.html and installed libjpeg from it. The freeswitch configure script recognized it.

But then another problem occured. The configure script failed because many warnings are treated as errors.

So I opened the configure script and deleted the following:


  if test "x$SWITCH_AM_CFLAGS" = "x"; then
    test "x$silent" != "xyes" && echo "  setting SWITCH_AM_CFLAGS to \"-Werror\""
    SWITCH_AM_CFLAGS="-Werror"
  else
    apr_addto_bugger="-Werror"
    for i in $apr_addto_bugger; do
      apr_addto_duplicate="0"
      for j in $SWITCH_AM_CFLAGS; do
        if test "x$i" = "x$j"; then
          apr_addto_duplicate="1"
          break
        fi
      done
      if test $apr_addto_duplicate = "0"; then
        test "x$silent" != "xyes" && echo "  adding \"$i\" to SWITCH_AM_CFLAGS"
        SWITCH_AM_CFLAGS="$SWITCH_AM_CFLAGS $i"
      fi
    done
  fi

I ran the configure script again this time successfully. Then, sudo make, sudo make install. This will install the freeswitch into /usr/local/freeswitch.


make cd-sounds-install cd-moh-install


Then, freeswitch is ready for testing. Username 1000 until 1009 are automatically created with password 1234.

Integrating Level Helper to hybrid project iOS+Android using Cocos2d-x

The wonder of Cocos2dx is: it's written in C++. And because it's written in C++, it can run on any system that supports C++. That means all systems, except Windows phone (as of this writing).

To integrate Level Helper to hybrid iOS Android Cocos2d-x project (common C++ codes for both iOS and Android), first create hybrid project as is explained in this post: http://growingshoot.blogspot.com/2013/04/cocos2dx-hybrid-project-ios-and-android.html

>> The trick to integrate Level Helper <<

Most Android does not support pvr.ccz, while most (or all?) iPhones support it. I want pvr.ccz for iPhone project, and plain PNG for Android project. pvr.ccz for iPhone project is even more compelling because most of the time, the PNG generated by SpriteHelper causes pngcrush caught libpng error  on compile time, while the same PNG file does not cause trouble for Android.

To achieve that,  I create the Sprite Helper project, and save the pvr.ccz version inside {PROJECT_NAME}/Resources directory and save the PNG version inside {PROJECT_NAME}/android/assets directory. Then, I create the Level Helper project inside {PROJECT_NAME}/Resources directory.

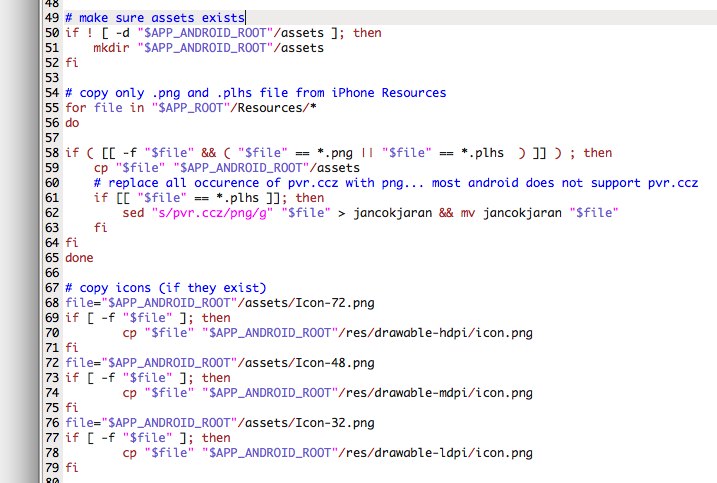
The {PROJECT_NAME}/android/build_native.sh needs modification so it does not delete the assets directory and replace it with contents of Resources directory. It also must copy only PNG and plhs (project file of Level Helper) from inside Resources directory into the assets directory. When copying plhs file, it must replace all occurences of pvr.ccz strings with png strings.

Following screenshots, respectively: saving Sprite Sheet for iPhone project (pvr.ccz, cocos2d-x resource handling, hd suffix set, 2x hd suffix empty), saving Sprite Sheet for Android project (png, cocos2d-x resource handling, hd suffix empty, 2x hd suffix empty), new build_native.sh file, old build_native.sh file.


New build_native.sh below and old build_native.sh above:


2. Do not forget to set content scale factor to 2 in App Delegate!     pDirector->setContentScaleFactor(2); You must also tell iPhone to look inside hd directory for files when in Retina mode: CCFileUtils::sharedFileUtils()->setResourceDirectory("hd"); This must be done before loading level. Can not be done in App Delegate!

3. C++ codes generated by Level Helper must be referenced in the {Project name}/android/jni/Android.mk file (LOCAL_SRC_FILES for the cpp files and LOCAL_C_INCLUDES for the headers). The following are my Android.mk file and my project structure (I put LevelHelper dir, which is codes generated by LevelHelper, under Classes dir).


Cocos2dx hybrid project iOS and Android

So I'm porting a game from iOS to Android. It's a Cocos2d game. Naturally I look to implementing the Android port using Cocos2dX, since it's a C++ port of Cocos2d.
I found many tutorials online of how to create a shared project for Android and iOS. By "shared", I mean the C++ code. The C++ code is common to iOS and Android. With some Objective-C code binding for the iOS project and some Java code for the Android project.
But the Objective-C and Java codes are small and do not change.
The ones that change is the C++ codes, shared by iOS and Android project.
Among all tutorials online, I find this one most concise and easy to follow: http://www.bold-it.com/ios/cocos2d-x-box2d-iosandroid-hybrid-tutorial/

It's just that the tutorial is written for Cocos2d-2.0-x-2.0.2. The most current version as of this writing is Cocos2d-2.0-x-2.0.4.
Only minor version change but I had to make some extra adjustment to compile and run both project successfully.

So, follow the steps in the above tutorial:
1. Download Cocos2dx.
2. Install the XCode template: ./install-templates-xcode.sh
3. Create XCode project for iOS.
4. Edit the create-android-project.sh file before creating the Android project. Set the NDK_ROOT_LOCAL and ANDROID_SDK_ROOT_LOCAL variables.
5. Execute create-android-project.sh --box2d to create Android box2D project.
6. Make sure it compiles by executing ./build_native.sh
7. Move the necessary Android files:

  • Move the /testgame/proj.android folder to the iphone project folder, next to ios. Rename it android.
  • Copy the /external/Box2D folder into /libs/, replace what is there.
  • Copy the /cocos2dx folder into /libs/, replace what is there.
  • Copy the /CocosDenshion/android folder into /libs/CocosDenshion/
  • Copy the /extensions folder to /libs/, replace what is there.
8. In /android/build_native.sh, change line 40: COCOS2DX_ROOT="$DIR/../libs"
9. Next, in android/jni/Android.mk, add a LOCAL_C_INCLUDES path to Box2D and change “$(call import-module,external/Box2D)” to “$(call import-module,Box2D)”. To be able to see logs in Logcat, add LOCAL_CFLAGS += -DCOCOS2D_DEBUG=1. Delete this line or set the value to 0 for production to improve efficiency.
This is how my Android.mk looks like:

After the log is enabled, you can see the log output from console by typing: adb logcat | grep D/cocos2d-x. Don't forget to use CCLOG to print debugging messages.
10. Update android.library.reference.1 in android/project.properties:

# Project target.
target=android-10
android.library.reference.1=../libs/cocos2dx/platform/android/java
11. Define sdk.dir in libs/cocos2dx/platform/android/java/ant.properties as such:
sdk.dir=/Users/firman/Documents/android-sdk-macosx
12. Edit the target in libs/cocos2dx/platform/android/java/project.properties to match the target defined in android/project.properties:
target=android-10

Done! Now you can run the iOS project from inside XCode. As for the Android project:


./build_native.sh clean
./build_native.sh
ant debug
adb install -r bin/testgame-debug.apk
adb shell am start -a android.intent.action.MAIN -n com.boldit.testgame/.testgame

Find files/dirs recursively and do something

The following will find all files in the current directory and all of current subdirectories matching .git* and delete them:

sudo find ./ -type f -name '.git*' -exec rm  {} \;

The following will find all directories named .git in the current dir and subdirs and delete them:

sudo find ./ -type f -name .git -exec rm  {} \;

Notice how you escape the asterisk by including it within a pair of single quotes.

SVN replace local files/dirs with the ones from repo

I used to think that SVN has some kind of 'replace' command, as this is present in SVN plugin in Eclipse. But now that I turn to using SVN from the Mac terminal,, I find out that this is not the case. SVN does *not* have replace command. But there's a trick to achieve the replace functionality:

rn -rf baddirectory
svn update baddirectory


Manually install oSIP and eXosip as library on Mac OS X Mountain Lion

No problem with oSIP. Just do the usual configure && make && make install (the last one as root).

It is best to have the autotool from GNU, and not from Apple, of which autoconf and make are part. To install GNU autotool, please ryou need to install XCode (and the Command Line Tools: XCode -> Preferences -> Download -> Component -> Command Line Tools) and mac ports first (www.macports.org) and then:


Once xcode and macports are installed, open a terminal and install the required build-time tools with:

$ sudo port install coreutils automake autoconf libtool intltool wget pkgconfig cmake gmake yasm grep doxygen ImageMagick optipng


Install gas-preprosessor.pl (http://github.com/yuvi/gas-preprocessor/ ) to be copied into /opt/local/bin :

$ wget --no-check-certificate https://raw.github.com/yuvi/gas-preprocessor/master/gas-preprocessor.pl
$ sudo mv gas-preprocessor.pl /opt/local/bin/.
$ sudo chmod +x /opt/local/bin/gas-preprocessor.pl

Link macport libtoolize to glibtoolize

$ sudo ln -s /opt/local/bin/glibtoolize /opt/local/bin/libtoolize

Link host's strings to simulator SDK

For Xcode prior to 4.3:
$ sudo ln -s /usr/bin/strings /Developer/Platforms/iPhoneSimulator.platform/Developer/usr/bin/strings
For newer XCode:
$ sudo ln -s /usr/bin/strings /Applications/Xcode.app/Contents/Developer/Platforms/iPhoneSimulator.platform/Developer/usr/bin/strings


The above lines are from the README of the linphone. Basically you want to install the autotools, but I don't actually know which part of those packages comprise autotools. Some of them are obviously not related to autotools, like the ImageMagick. But just to be safe.... :-))

So, after you install the autotool, the next thing to do is.... trying to configure. It went well for oSIP but not so well for eXosip. configure script for eXosip gave me this:


Undefined symbols for architecture x86_64:
  "_CFRelease", referenced from:
      __tls_add_certificates in eXtl_tls.o
  "_Gestalt", referenced from:
      __tls_add_certificates in eXtl_tls.o
  "_SecKeychainItemCopyAttributesAndData", referenced from:
      __tls_add_certificates in eXtl_tls.o
  "_SecKeychainItemFreeAttributesAndData", referenced from:
      __tls_add_certificates in eXtl_tls.o
  "_SecKeychainOpen", referenced from:
      __tls_add_certificates in eXtl_tls.o
  "_SecKeychainSearchCopyNext", referenced from:
      __tls_add_certificates in eXtl_tls.o
  "_SecKeychainSearchCreateFromAttributes", referenced from:
      __tls_add_certificates in eXtl_tls.o
ld: symbol(s) not found for architecture x86_64
collect2: ld returned 1 exit status
make[2]: *** [libeXosip2.la] Error 1
make[1]: *** [all-recursive] Error 1
make: *** [all] Error 2

After some searching, I found out that I needed to link against frameworks on Mac OS. So instead of simply calling configure, I needed to call this:

LDFLAGS="-framework CoreFoundation -framework CoreServices -framework Security" ./configure

And then make, and sudo make install. And done!

CoreFoundation is for _CFRelease, CoreServices is for _Gestalt and Security for the others (keychain access).

Stupid XCode: XCode can not run using the selected device

I got the following error out of sudden:


I swear I did not touch the project settings! It had run well the previous time, but not anymore now! I did a google search and it baffled me to read how many problems could cause this and what the possible solutions are.

I finally nailed it: it was caused by a key in info.plist file which had no value: "Icon file". Below it is a another key: "Icon files" having value of an icons array.

I deleted that Icon file key and the project runs well again. But that problem could have easily been caused by many other factors.... the error message does not help at all!

Getting LG L5 to be recognized by ADB on Ubuntu

I never had problem with my Samsung Galaxy W. I connected it to my Ubuntu, I issued adb install on the terminal, and everything went smoothly. Not a single problem.

Then I needed to upgrade to ICS. Samsung Galaxy wouldn't let me upgrade from Gingerbread to ICS. SO I bought LG L5 with ICS.

I connected LG L5 to my Ubuntu, issued adb install and....
adb spat this back to me:

error: insufficient permissions for device 

What went wrong???? I issued adb devices to list the Android devices latched to my Ubuntu. It gave me this:

List of devices attached 
????????????        no permissions 

So my LG is not recognized by Ubuntu. It turns out that you need to create udev file for every device that you are using. So you need to create this file as root: /etc/udev/rules.d/lg-android.rules

The file name is arbitrary, just as long as it ends with .rules extension. Use descriptive file name. In that directory I have lg-android.rules and htc-android.rules files. Add this line to the file:

SUBSYSTEM=="usb", ATTR{idVendor}=="1004", MODE="0777"

The number 0bb4 is manufacturer ID and must be replaced by the manufacturer ID of your device. List follows. And mode is the permission. I set it to 0777 just to make sure every body can execute, write to and read from the device.

Then save the file, and set its permission to be executable and readable by all.

sudo chmod a+rx /etc/udev/rules.d/70-android.rulessd

Then unplug the device, plug it again and issue adb devices again. If your device is not listed, wait a few minutes and issue adb devices again. Should be listed now. Otherwise, I don't know what's gone wrong. :p
One more thing, I need to set my LG L5 connectivity to Media sync (MTP) and enable USB debugging. MTP basically tells my device to act like USB thumb drive.

Following is the result of adb devices issued on my Ubuntu terminal after the above steps are conducted:


List of devices attached
LGOTMSe8ae1617 device


What baffles me is that, why does Samsung get recognized right away, and why does my LG L5 gets recognized automatically on Mac? All the above steps are absolutely unnecessary on Mac...

MANUFACTURERUSB VENDOR ID
Acer0502
Dell413c
Foxconn0489
Garmin-Asus091E
HTC (Older Phones)0bb4
HTC (Newer phones)18d1
Huawei12d1
Kyocera0482
LG1004
Motorola22b8
Nexus One/S18d1
Nvidia0955
Pantech10A9
Samsung04e8
Sharp04dd
Sony Ericsson0fce
ZTE19D2
Ref:
http://esausilva.com/2010/05/13/setting-up-adbusb-drivers-for-android-devices-in-linux-ubuntu/

Change the extension of all files in a directory

I had a slew of .cxx files inside my directory and I needed to change them to .cpp.

rename 's/.m4b$/.m4a/' *.m4b

Code snippet to calculate md5 in C/Ubuntu

First, sudo apt-get install libssl-dev
And then, compile it using the -lcrypto flag to link against /lib/i386-linux-gnu/libcrypto.so.1.0.0 

#include
#include
#include
#include

char *str2md5(const char *str, int length) {
    int n;
    MD5_CTX c;
    unsigned char digest[16];
    char *out = (char*)malloc(33);

    MD5_Init(&c);

    while (length > 0) {
        if (length > 512) {
            MD5_Update(&c, str, 512);
        } else {
            MD5_Update(&c, str, length);
        }
        length -= 512;
        str += 512;
    }

    MD5_Final(digest, &c);

    for (n = 0; n < 16; ++n) {
        snprintf(&(out[n*2]), 16*2, "%02x", (unsigned int)digest[n]);
    }

    return out;
}

int main(int argc, char **argv) {
  char *output = str2md5("hello", strlen("hello"));
  printf("%s\n", output);
  free(output);
  return 0;
}

Comparison of memory footprints of different textures available in Cocos2d

So I have been fiddling with textures in Cocos2d to find out what image format produces the least memory foot print while not degrading quality in a very visible manner.

So I created an original PNG image, and then converted it to different image formats using Texture Packer. I then created an XCode project to load those images and print out the memory footprint. The XCode project can be fetched from: https://github.com/rumahfirman/texture-format

First, I will list image format from biggest memory foot print to smallest memory foot print (the original image is original.png which is RGBA 8888):


"original.png" file size=5 KB rc=2 id=2 1024 x 1024 @ 32 bpp = 4096 KB 
"rgba4444.png" file size=4 KB rc=2 id=3 1024 x 1024 @ 32 bpp = 4096 KB
"rgba4444fsa.png" file size=131 KB rc=2 id=4 1024 x 1024 @ 32 bpp = 4096 KB
"rgb888.pvr.ccz" file size=2 KB rc=2 id=8 640 x 960 @ 32 bpp = 2400 KB
"rgba4444fsa.pvr.ccz" file size=90 KB rc=2 id=9 1024 x 1024 @ 16 bpp = 2048 KB
"rgba4444fs.pvr.ccz" file size=16 KB rc=2 id=10 1024 x 1024 @ 16 bpp = 2048 KB
"rgba5551fs.pvr.ccz" file size=50 KB rc=2 id=11 1024 x 1024 @ 16 bpp = 2048 KB
"rgba5551fsa.pvr.ccz" file size=120 KB rc=2 id=12 1024 x 1024 @ 16 bpp = 2048 KB
"rgb565.pvr.ccz" file size=140 KB rc=2 id=7 640 x 960 @ 16 bpp = 1200 KB
"pvrtc4.pvr.ccz" file size=20 KB rc=2 id=6 1024 x 1024 @ 4 bpp = 512 KB
"pvrtc2.pvr.ccz" file size=16 KB rc=2 id=5 1024 x 1024 @ 2 bpp = 256 KB

From the above data, it can be seen that file size does not correlate to memory footprint. The smallest file size (which is 4 KB) produces the biggest memory foot print (4096 KB).

It is also obvious that the memory footprint of RGBA 4444 uncompressed PNG is the same as the original image which is RGBA 8888. So RGBA 4444 does not produce memory saving, yet result in quality degradation.

In the above file name, the suffix fs stands for Floyd Steinberg dithering. FSA stands for Floyd Steinberg Alpha dithering.

Dithering basically means to smoothen your image. If your original image contains color gradation, dithering is especially important. Reducing image quality often results in abrupt color changes while in the original image, the color gradually changes. This can be rectified by dithering and FS works well.

If your original image contains alpha channel, FSA also dithers the alpha channel, creating "dotted artifacts", which is especially visible if your image z-order is higher than some other image, i.e there is an image located behind the dithered image. To rectify this, choose FS without A, i.e dither all channels in the image except the alpha channel.

Now let's talk about quality. From best to worse:
Original
RGB 888
RGBA 5551
RGBA 4444
RGB 565

Rule of thumb: if possible, always use RGB 565 for background images.

oSip and eXosip

I set out to understand linphone source code so I decided to learn SIP and tried to built a terminal SIP client. A simple one. No voice, no nothing, just to perform signalling, registering to SIP registrar. That's all.

I started out by learning oSip. I found out later that oSip is lower level, suitable to build lower level service like SIP proxies or registrars, but too cumbersome to build SIP clients. eXosip is more suitable (=easier to use) to build SIP clients since eXosip is a higher layer abstraction over oSip.

Anyway, I'll tell my story with oSip first. So I installed both osip and exosip on my Ubuntu using the default packaged.

sudo apt-get install libexosip2-dev

The above command will automatically install libosip2 since libosip2 is libexosip2's dependency. I adapted wen's tutorial here for Linux (he wrote it for Windows).

From oSip mailing list, Aymeric Moizard (oSip and eXosip author) told me that the packaged lib is outdated. The Ubuntu packaged library is version 3 (while the latest is version 4) and I needed to compile my source files using the switch  -DOSIP_MT . I don't need to use that option if I compile and link my source against the latest (v4) library.

I then decided to download the latest (version 4 as of this writing) oSip and eXosip source from the GNU repo and compiled and installed them on my own. The library is installed inside /usr/local/lib.
When reading the README of eXosip, it told me to install c-ares for asynchronous network operation, so I did that too.

There are quite some things that I learnt during compilation with these libraries.

First of all, I need to run ldconfig as a root right after I install the libraries. I don't really understand why, but otherwise I get numerous errors when compiling and then linking against the newly installed libraries.

Since I have two kinds of osip and exosip (one installed by apt-get, one manually installed), I need to tell the compiler which lib I want to use. I want to compile against the latest, which is manually installed, so this compiler option is necessary:

-L/usr/local/lib

It tells the compiler the location of my library. I also learnt how library naming system works. Library names end with .a extension and starts with the substring lib. For instance, the following is the result of doing ls /usr/local/lib on my system:


If you want to link against a certain library, then strip the lib and the extension from the library name, and prepend -l to it and use it as compiler option. So if you want to link against libeXosip2.a, you put this as compiler option:

-leXosip2

Or you can also use the cumbersome and longer form:

g++ myfile.c  /path/to/my/libeXosip.a

Anyway, the following is my simple Makefile to compile my eXosip source:


exosip: exosip.c
g++ -L/usr/local/lib -Wall -g exosip.c -o exosip -leXosip2 -lcares -DENABLE_TRACE


I needed to remove -DENABLE_TRACE (against what the README recommended) because it gave me errors. I need to find out why.

Emacs

A recent project revived my interest in Emacs. I used it daily back then when I was in college and was pretty fluent in using it as editor for my C codes. Back then.

Now after years of not using it, my Emacs knowledge has become rusty. Looked up the web for tutorial and found a good one:

So basically I can also compile C codes from within Emacs. I can access shell from within Emacs. I just have to create a file called .emacs in my home directory as per the instruction in the above web page and fill it with following configurations:


(global-font-lock-mode t)
(global-set-key "\C-xs" 'save-buffer)
(global-set-key "\C-xv" 'quoted-insert)
(global-set-key "\C-xg" 'goto-line)
(global-set-key "\C-xf" 'search-forward)
(global-set-key "\C-xc" 'compile)
(global-set-key "\C-xt" 'text-mode);
(global-set-key "\C-xr" 'replace-string);
(global-set-key "\C-xa" 'repeat-complex-command);
(global-set-key "\C-xm" 'manual-entry);
(global-set-key "\C-xw" 'what-line);
(global-set-key "\C-x\C-u" 'shell);
(global-set-key "\C-x0" 'overwrite-mode);
(global-set-key "\C-x\C-r" 'toggle-read-only);
(global-set-key "\C-t" 'kill-word);
(global-set-key "\C-p" 'previous-line);
(global-set-key "\C-u" 'backward-word);
(global-set-key "\C-o" 'forward-word);
(global-set-key "\C-h" 'backward-delete-char-untabify);
(global-set-key "\C-x\C-m" 'not-modified);
(setq make-backup-files 'nil);
(setq default-major-mode 'text-mode)
(setq text-mode-hook 'turn-on-auto-fill)
(set-default-font "-misc-fixed-medium-r-normal--15-140-*-*-c-*-*-1")
(setq auto-mode-alist (cons '("\\.cxx$" . c++-mode) auto-mode-alist))
(setq auto-mode-alist (cons '("\\.hpp$" . c++-mode) auto-mode-alist))
(setq auto-mode-alist (cons '("\\.tex$" . latex-mode) auto-mode-alist))

;(require 'font-lock)
;(add-hook 'c-mode-hook 'turn-on-font-lock)
;(add-hook 'c++-mode-hook 'turn-on-font-lock)


The following is custom command to compile, run, and access terminal from within Emacs when the above config has been done:


Step Four - Compile the program and prepare the executable

  • Now, to compile your program just type make at the UNIX prompt.Alternatively (and this is recommended) if you have installed the appropriate .emacs file you can continue to do everything from inside emacs:
  • Use Ctrl-x b to switch back to hello_world.cpp.
  • Now press Ctrl-x c and hit enter to begin the compilation.
  • The screen will split into two windows (press Ctrl-x o to switch between them and Ctrl-x 1 to return to single window mode).
  • If there are any errors they should be listed in the compilation window. To correct them use Ctrl-x g to go to a particular line (alternatively advanced users might like to edit their .emacs file and map the emacs command next-error onto a key of their choice).

Step Five - run the executable program

  • To execute your program just type ./hello_world at the UNIX prompt.Alternatively, you can continue to work from inside emacs (with the recommended .emacs files):
  • If you are not in two window mode, press Ctrl-x 2.
  • If you are not in the lower of the two windows, press Ctrl-x o until you are.
  • Press Ctrl-x Ctrl-u to bring up a UNIX prompt inside the current emacs window.
  • Now type ./hello_world at the UNIX prompt. All the output from the program will be displayed in the emacs window.

Installing Linphone for Ubuntu

As is always the case with Linphone, there are many steps not written in the README that one needs do.

First get linphone:

git clone git://git.linphone.org/linphone.git --recursive


And then, do the following (I'm on Ubuntu. If your on other distros the lib name might be different!)


sudo apt-get install libgtk2.0-dev
sudo apt-get install intltool
sudo apt-get install libosip2-dev
sudo apt-get install libexosip2-dev
sudo apt-get install libspeex-dev
sudo apt-get install libspeexdsp-dev
sudo apt-get install ffmpeg
sudo apt-get install libavcodec-dev
sudo apt-get install libswscale-dev
sudo apt-get install libxv-dev
sudo apt-get install libv4l-dev

Lib name is case sensitive and differ from platform to platform. To know the exact lib name, you can go to http://pkgs.org/search and enter the common lib name (as is mentioned in the README) in the search field in the top right corner. The site will then list the exact library name for your distro and how to install it. Very convenient!

After all the above directories are installed, enter the directory where you git pulled linphone and do:

./autogen.sh
./configure
make
sudo make install

Last step, you need to have the shared dynamic library generated during linphone compilation into your path. I added the following line to my ~/.profile

export LD_LIBRARY_PATH=$LD_LIBRARY_PATH:/usr/local/lib

And then I restarted my machine to make the changes in profile takes permanent effect.

Now linphone is installed in /usr/local/bin and just type:

linphone

from terminal to execute it.

PVR Texture Format, Texture Cache

I have been looking around for tools to make my sprite sheet smaller. People say that PVR textures are the way to go.

So the graphics processor on iPhone is a design licensed from Power VR  (http://en.wikipedia.org/wiki/PowerVR). PVR textures are in such a format that Power VR graphics chips can easily digest, resulting in much faster processing. And smaller file size.

Sometime ago I bought Vladu Bogdan's SpriteHelper and LevelHelper toolsuite. In SpriteHelper, there is an option to save the resulting sprite sheet into a PVR format. But the quality is so low (it's lossily compressed). I'm looking for a tool that enables me to reduce the size and memory footprint of my sprite sheets without the quality degradation (lossless compression or uncompressed).

I used Level Helper in just one project that needed it. It's ok. I use Sprite Helper quite a lot but recently with the introduction of the Gatekeeper for Mac, it has become increasingly a pain to use. Really. It just frustrates me how Sprite Helper gets stuck at the beach ball of death phase when starting up. How it fails to save the plist, how it won't add  multiple images at once, etc. I have just grown sick of it now.

Anyway, back to PVR.

XCode comes with a tool to convert sprite sheet into PVR texture, but just as SpriteHelper, it uses lossy compression. The tool can be found in dir: /Applications/Xcode.app/Contents/Developer/Platforms/iPhoneOS.platform/Developer/usr/bin/texturetool

It's called texturetool.

Another tool: TexturePacker. I read people praising it, but it's paid app. Haven't tried.

Then there is this tool from Power VR themselves: PVRTexTool. It comes with both GU and CL interfaces. But I have not managed to get it working. I mean, I can't get it to convert my PNG files (generated by Sprite Helper) into pvr format.

So I fall back to texturetool. I created a small bash script to convert all PNG files in a directory into PVR format. Here it is:


#!/bin/bash

for file in `find ./ -name "*png"`
do
texturetool  -e PVRTC --bits-per-pixel-4 -f PVR -m  -o $file.pvr $file
done


The image quality is lower than the original PNG and in some cases the difference stands out. But I have not got much of a choice right now. Will tinker with PVRTexTool later when I got time.

I also learn about how sprite frame cache and texture cache work in Cocos2D. So basically texture cache is a dictionary with keys being the file/texture names and values the textures. One texture can (and should) contain a whole slew of images. Not just one. And you access each image by sprite frame cache.

So for instance you have image1.png, image2.png.... image50.png. You pack them into one big image using Sprite Helper or other tools. And then you have another file describing the position/coordinate of each image. This file is called the plist file. It's a dictionary with key being the individual image name (image1, etc) and value the coordinate of it in the big, packed image.

You create sprite frame cache from the plist (i.e you pass the plist name as the argument into sprite frame cache static methods). Then sprite frame cache will try to load the image with the same name as the plist into the texture cache. Sprite frame cache will expect the image to end with the png extension. If you have different image extension, such as pvr, you need to load the image manually into the texture  cache. Code snippet:


    CCSpriteFrameCache *frameCache = [CCSpriteFrameCache sharedSpriteFrameCache];
    NSString *spriteFrameName = @"myplistfile.plist";
    NSString *textureName = @"myspritesheet.pvr";
    CCTexture2D *texture = [[CCTextureCache sharedTextureCache] textureForKey:textureName];
    [frameCache addSpriteFramesWithFile:spriteFrameName texture:texture];


Ubuntu failed to connect to LAN

Someone screwed up with my computer LAN cabling at office, and now my Ubuntu could not connect to internet. It turned out to be such a headache to fix.
It was a headache. But should it happen again, it won't be, since now I know how to fix it.

Click on the internet connection icon on top right corner of the desktop. Edit a connection and choose to set it up manually. Fill in the IP, subnet mask and gateway.

And another important bit, set up the DNS. You can't set it up via that GUI interface in the preceding paragraph. Edit the file /etc/resolv.conf instead. On my Ubuntu 12, this file is a symlink to the /run/resolvconf/resolv.conf. The latter file is automatically generated by the resolvconf tool. So to manually edit DNS, you must first delete the symlink /etc/resolv.conf. And then, create a regular file at the same location, and enter in your DNS settings, such as below:

nameserver 192.168.0.11
nameserver 8.8.8.8

Restart the machine and you should be connected now.

Compile linphone for iPhone

My environment is Mac OS X Lion, newest macports (version 2.1.2). I followed the README down to each letter but errors were returned. The tools in the newest version of Macports have different requirements than the older ones used to write the README.

I then submitted a question to the linphone mailing list and got an answer. As follow:

Arek,

I've been struggling with this for days. It's mystifying to me that it was so hard to get working. I'm using Mountain Lion, Xcode 4.5, and iOS 6. I wonder if perhaps MacPorts is now installing newer versions of the tools required by the install guide.

At any rate, I just got Linphone fully built earlier today. To fix your 'install-sh' problem, you just need to create an empty file that is required by newer versions of autoconf:
> 'touch submodules/linphone/install-sh

At this point, I was stumped for a very long time by another error: 
> ./configure: line 4543: syntax error near unexpected token `HAVE_MD5SUM,test'
> ./configure: line 4543: `AM_CONDITIONAL(HAVE_MD5SUM,test -n $MD5SUM)'
As it turned out, the problem was again triggered by a line in configure.ac:
> configure.ac:42: error: 'AM_PROG_CC_STDC': this macro is obsolete.

The solution was to edit submodules/linphone/configure.ac and delete the line that says:
AM_PROG_CC_STDC
You will need to 'make veryclean' or run 'cd build/linphone; ./autogen.sh'

Incidentally, while working through this I also figured out the necessary steps to replace MacPorts with brew which has the advantage of being more self-contained and easily reversible than MacPorts.
1) Install brew: (instructions at http://mxcl.github.com/homebrew/)
2) Install dependencies:
brew install coreutils automake autoconf libtool intltool 
brew install wget pkgconfig cmake gmake yasm doxygen ImageMagick optipng
brew tap homebrew/dupes
brew install xz homebrew/dupes/grep

Linphone is hardcoded to look for a lot of tools in MacPorts-specific locations, (e.g. /opt/local/bin) so I also had to create a link from there to brew's standard install location: 'ln -s /usr/local /opt/local'

Good luck!
Eli

On Jan 15, 2013, at 12:00 PM, linphone-developers-request@nongnu.org wrote:

> Message: 1
> Date: Tue, 15 Jan 2013 16:08:36 +0800 (SGT)
> From: Firman 
> To: linphone-developers@nongnu.org
> Subject: [Linphone-developers] liblinphone SDK build failed.
> Message-ID:
>     <1358237316.44153.YahooMailClassic@web193306.mail.sg3.yahoo.com>
> Content-Type: text/plain; charset="iso-8859-1"

> Hi everybody,
> I have sifted through the mailing list archives but have not found anyone posting the same build failure problem as mine.

> So I cloned the git repo for iPhone
> git clone 
> git://git.linphone.org/linphone-iphone.git?--recursive

> and then followed everything that the README file says about how to build the liblinphone SDK down to each letter. And then I do

> sudo make all.

> It failed first with the following error:

> Generating configuration files for Speex, please wait....
> ? aclocal 
> configure.ac:5: error: 'AM_CONFIG_HEADER': this macro is obsolete.
> ??? You should use the 'AC_CONFIG_HEADERS' macro instead.
> /opt/local/share/aclocal-1.13/obsolete-err.m4:12: AM_CONFIG_HEADER is expanded from...
> configure.ac:5: the top level
> autom4te: /opt/local/bin/gm4 failed with exit status: 1
> aclocal: error: echo failed with exit status: 1
> make[1]: *** [/Users/barablu/Documents/workspace/liniphone/linphone-iphone/submodules/build/..//externals/speex/configure] Error 1
> make: *** [build] Error 2

> I then changed line 5 of configure.ac in speex directory from 
> AM_CONFIG_HEADER to AC_CONFIG_HEADERS. That error went away but now I get the following error that I have no clue how to solve. Can anybody please help me? I'm using XCode 4.5, iOS SDK 6, Mac OS X Lion. Thank you.

> Best regards,
> Arek Malang

> configure: loading site script /Users/barablu/Documents/workspace/liniphone/linphone-iphone/submodules/build/..//build/iphone-config.site
> Loading config.site for iPhone platform=Simulator version=4.0
> /Developer/Platforms/iPhoneSimulator.platform/Developer/SDKs/iPhoneSimulator4.3.sdk
> /Developer/Platforms/iPhoneSimulator.platform/Developer/SDKs/iPhoneSimulator3.2.sdk
> /Developer/Platforms/iPhoneSimulator.platform/Developer/SDKs/iPhoneSimulator4.0.sdk
> /Developer/Platforms/iPhoneSimulator.platform/Developer/SDKs/iPhoneSimulator4.1.sdk
> /Developer/Platforms/iPhoneSimulator.platform/Developer/SDKs/iPhoneSimulator4.2.sdk
> /Developer/Platforms/iPhoneSimulator.platform/Developer/SDKs/iPhoneSimulator5.0.sdk
> Selecting SDK path = /Developer/Platforms/iPhoneSimulator.platform/Developer/SDKs/iPhoneSimulator5.0.sdk
> configure: error: cannot find install-sh, install.sh, or shtool in "/Users/barablu/Documents/workspace/liniphone/linphone-iphone/submodules/build/..//linphone" "/Users/barablu/Documents/workspace/liniphone/linphone-iphone/submodules/build/..//linphone/.." "/Users/barablu/Documents/workspace/liniphone/linphone-iphone/submodules/build/..//linphone/../.."
> make[1]: *** [/Users/barablu/Documents/workspace/liniphone/linphone-iphone/submodules/build/../build-i386-apple-darwin/linphone/Makefile] Error 1
> make: *** [build] Error 2